What is Facebook Retargeting Pixel?
Facebook retargeting pixel is actually a code generated by Facebook. You can install Facebook retargeting pixel on your website to track id of visitors. This pixel allows you to identify your website visitors then later you can re-target them on Facebook by creating a custom audience when you run Facebook ads.
Why you need a Facebook Retargeting Pixel?
If you are creating an ads campaign on Facebook for your brand or products, you might be struggling on which audience you should target first. But don’t you forget that you may already have an audience built already? They are your website visitors who came to your website and perhaps still didn’t make purchase of your products. You shouldn’t lose them. When you install Facebook retargeting pixel, you can identify your visitors on Facebook and re-target them when running Facebook ads to get them coming back to complete their purchase. Even more, you can find similar people to your visitors to target who likely have the similar interest, behavior, background etc.
How to create Facebook Retargeting Pixel?
Follow below steps to create retargeting pixel:
Step 1: Firstly, login to your Facebook account and visit Ads Manager.
Step 2: Next, click on Tools » Pixels to create your Facebook pixel.
Step 3: Click on the Create a pixel button then give your pixel a name. There’s only one pixel per ad account, so choose a name that represents your business.
Step 4: Click Create Pixel. You will see a success message with the unique ID of your pixel.
Now click on ‘Install Pixel Now’ button to get the pixel code. Facebook will show you the Pixel code that you need to install. Simply copy the pixel code, and move to next section to see how to install Facebook retargeting pixel in WordPress.
How to install Facebook Retargeting Pixel in WordPress sites?
To install Facebook retargeting pixel, you need to add the Facebook Pixel code just before the </head> in your WordPress theme. Most of Sitesao WordPress themes allows you to add custom code into header in theme options. You can paste your Facebook Pixel code in the header section and click on the save button to store your changes.
For themes that do not support adding header custom code, you can use third party plugins to insert header to your site.
Create Custom audience using Facebook Retargeting Pixel
- Click Tools, then choose Audiences
- Click Create Audience
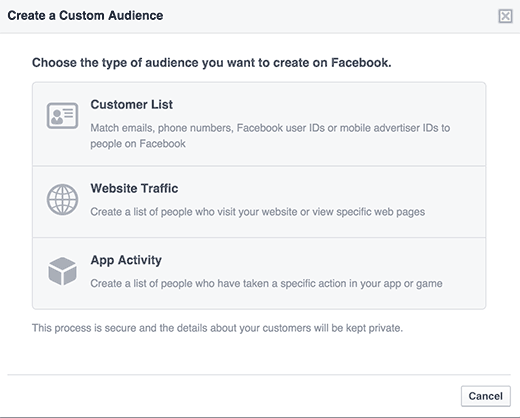
- Select Custom Audience. You can choose a customer list, website traffic, or app activity. In this tutorial, we will choose website traffic.

- Give your Custom Audience a name and choose a website traffic option. You can choose all website visitors, people who visit specific pages, people who don’t visit specific pages, and so on. You can also create custom combinations. Click Create Audience to save.

Once you are done, you can use this audience to target for ads campaign you will run for your website or may create look-alike custom audience to target more people.

